Nails and reading may be my passions, but my family is my whole reason for living, so I'm sure you will hear a lot about all of them throughout the course of this blog. I am the mommy of 3 wonderful little guys (Jesse, Michael, and Benjamin), whom I am lucky enough to get to stay home with every day. I am engaged to the wonderful love of my life, Rob. (Our family is finally complete now that we've "found Daddy," as our boys always say.) My babysitter kids are always hanging around the house, too, and are also a big part of our family.

Friday, August 30, 2013

This Week's Manis - Some Pink Blink and Some Fairy Dust

Hey Sweeties! So apparently I'm a semi-sucky blogger bc I haven't even managed to post my last two manis. On top of that, I felt so guilty for not blogging about my creations that I couldn't let myself post them in any of my Facebook groups yet. Any of you end up feeling guilty about not blogging often enough?

The good news for the week is that I overcame my dread of dealing with the post office and finally mailed out the nail mail I had sitting here staring at me.  ;)

This week, I did two manis. The first got a base of Wet n Wild MegaLast "Pinky Sweet" (which is a dupe of my Sinful Colors "Glass Pink," but I like the MegaLast brush better). Then I used the Konad m19 plate to do tips using Sally Hansen InstaDri "Pink Blink" and a flowery swirly pattern using Konad m85 over the whole nail, also stamped with the "Pink Blink." 

Mani using Sally Hansen Pink Blink and Konad m19 and Konad m85 over Wet n Wild MegaLast Pinky Sweet


Since my nails are a little long and wide, I used m85 sideways and double stamped the image. The next day I was looking through my new plates and could have kicked myself when I realized that some of Konad's new images are the same as older images, only made larger. This was the case with m97, which has the same flowery/swirly image I used from m85. I could have saved myself a little trouble if I had only paid more attention to my new plates.

***

The above mani kind of reminds me of another one I did 11 months ago using Ch44 from the Cheeky Summer set. It wasn't a mani I hated, but once again, ick at the acrylics I had back then. LOL 
September 20, 2012
***
The second mani I did this week started out with a base of black (WnW ML "Lights Out" just because I like that brush best) and a coat of China Glaze "Fairy Dust" holographic glitter over top. Then I used an image from the Cheeky Jumbo 3 "European Romance" plate and stamped it in Sally Hansen InstaDri "Rose Run." 

Mani using Sally Hansen Rose Run with China Glaze Fairy Dust and a Cheeky Jumbo European Romance Plate


Oh, one of these days I will figure out how to take the perfect picture of holographic polish and then you will all see some amazing mani pictures! The day after I took this polish off, I read that you should put your hand underwater to take pictures of holographic polish. Have any of you tried that? How did it work? 

Check back Sunday to see my Adventures in Stamping challenge mani. Have a great weekend Sweeties!

Saturday, August 24, 2013

Miss Me? Grand Reopening

Hey Sweeties! Here is my second try at blogging. Hope nobody missed me too terribly much this past 13 months. Ha ha. (Geesh, where is that sarcasm font when I need it?) The amazing nail group World of Nailcraft has inspired me to try this again, so hopefully I can do them justice.  ;) 

Since I'm about a year and a half behind with this mani posting business (oops!), I will be adding an old mani on the blogs with each new mani. Hopefully it will be obvious how much I have improved over time. I feel like I have learned SO much from the Facebook nail groups I hang out with.

Anyway, on to the manis!

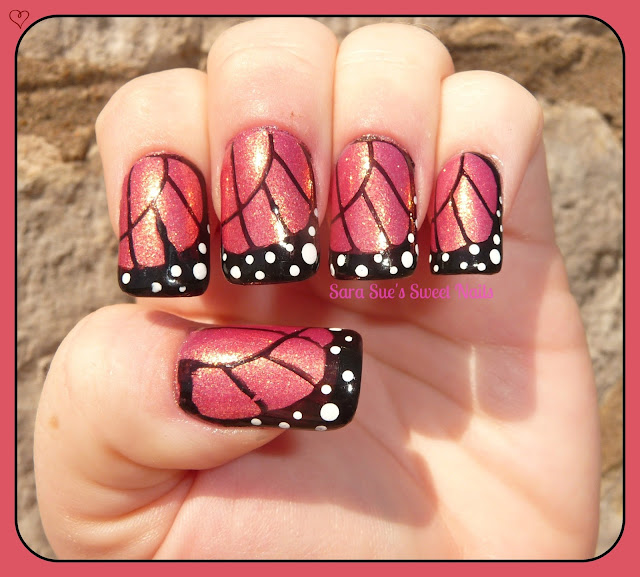
Last night I wasn't feeling very inspired, so I had only planned to grab an untried color and put a simple coat of polish on. What I picked out was Wet N Wild MegaLast "Lava Brew." I ended up liking it so much more than I expected! "Lava Brew" is a pink polish (On me? No way, right?), but it has hints of orangish gold in it. Needless to say, once my nails were polished, I just could not leave the mani alone at that; this was just screaming for some butterfly wings.

I got out my KD 26 plate for the butterfly wings, but wanna know a secret? The wing images from this maker are a little small for my nails, so I whipped out my m19 tip plate and did black tips before I stamped my butterfly wings on. That way, the whole nail was sure to be covered. 

After the stamping and clean up was finished, I added two sizes of dots with my dotting tool, used my favorite Sally Hansen Insta-Dri Top Coat, and here we are! 


Lava Brew Butterfly Mani using KD 26 and m19
Wet n Wild "Lava Brew" base with KD 26 butterfly wing plate

What do you think about butterfly wing manis? If you've done one, please share with me what your favorite base colors are for them. I'm always looking for good suggestions. :)

***

Okay, now here is a mani from a year ago. I'm kind of embarrassed to even show this, but I promised to include old manis in the blog, so here it is. The full nail images are from the plate BM-317 and the single images are from a Salon Express kit.


August 26, 2012

Oh boy. Obviously this isn't the best mani in the world, but I'm sure I was *really* proud of it last August. (You can't see, but I'm definitely rolling my eyes at last year's Sara Sue.) Just go easy on me and remember that at the time, I had only been doing nail art for about three months. And to be completely honest, I'm sure half of the reason I hate looking back at this mani is because I had acrylic nails back then. Eww, yuck! It absolutely makes me appreciate my CNS nails even more.

 ***

Even though I'm wishing I could go do a new mani, unfortunately I'm off to shampoo carpets and generally scrub the house down before my BenBen's birthday party on Monday. I can't believe my "baby" is 5 now! 

Have a great day, Sweeties! 

Friday, July 27, 2012

First Post Ever!

Hello everyone and welcome to my brand-new blog page!! I'm new to this and have no clue what I'm doing yet, so please keep that in mind. At this point, I've been doing nail art for a couple of months (mainly stamping, but I'm practicing dotting and some other techniques, too). I have learned a ton from all of the other amazing nail art bloggers, but I still have a long way to go until I'm great like they are.

The ladies from Adventures in Stamping have been such inspirations to my creative side that my most recent mani is my own version of the amazing sunset nails I've been drooling over this summer. And now that I've go the hang of sponge gradients, I could finally try it!

Here is the base I used. It was a yellow/orange/dark orange gradient. I'm kind of ashamed to admit that it turned out looking like candy corn. 


Luckily... once I got the stamping done, it looked more like a beautiful tropical sunset than a Halloween treat.

IN OTHER NEWS...
I got Jesse and Michael registered for 3rd grade and Kindergarten this morning. They're getting so big! Here is my Michel-Michel outside of his new classroom, standing beside the little face with his name on it.